Preview
There are two ways you can
use the dpsReality hardware to preview your Aura projects, RealTime and Disk-based
previews:
RealTime Preview
First, you can use the LockStep AU display device for real-time preview using Aura native "RealTime Preview" system.
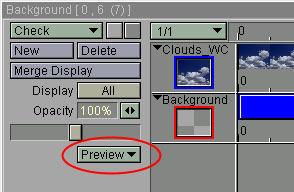
[1] Locate the [Preview] pop-up menu on the Layer panel, as shown on
the picture below.
[2] Set the preview device to "RealTime Preview".
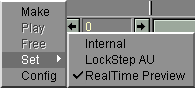
[3] Now access the [Preview] pop-up menu again, but this time select
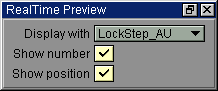
"Config" and on the "RealTime Preview" window select "LockStep
AU" as a "Display with" parameter.
[4] By selecting the "Make" item in the [Preview] pop-up menu,
Aura tries to play back the current project in real-time.
Note: Please refer to Aura Reference Guide (section 7.8) on how the Aura preview system operates. Also, keep in mind that the performance of the playback is limited by your system configuration. If you need exact FPS preview without drop frames, always use disk-based preview (see below).
Disk-based preview (.DPS file creation)
You can create a disk-based preview in the form of native .DPS file.
[1] You must set Lockstep AU as a preview display device using the [Preview] pop-up menu as shown below:

[2] Selecting "Config" brings on the LockStep AU Preview dialog window:
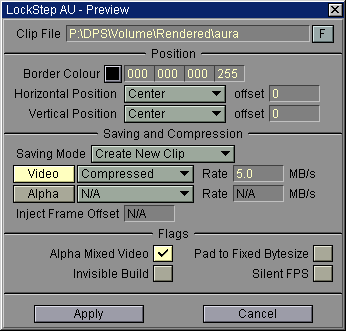
Clip file
Position
Border Color
Enables you to choose the color of a frame border (area of the frame
buffer not covered by painted image). The color can be set either by using the
color picker or by entering RGBA values manually into the appropriate input
boxes. Applicable only when your projects does not cover whole frame buffer
area.
Horizontal/Vertical Position
Controls the exact placement of a frame on your preview monitor. Vertical
and horizontal position can be set independently so that the rendered frame
can be centered or moved to a selected edge of the frame buffer. You can also
specify an offset in pixels, which is used to shift the frame away from the
currently selected edge.
Saving and Compression
Saving Mode
Basically,
there are two modes in which the animation saver operates. "Create Mode" allows
you to create a new file each time an animation is rendered - also it overwrites
any previous file with the same name. "Inject Mode" enables you to reuse an
existing DPS media file.
To create a new clip, you have to specify its compression method:
Video (Compressed/Uncompressed) rate (MB/s)
Here you can set the data rate when "Compressed" is selected or you
can choose to save your animation "Uncompressed". In cases when you only want
to save the alpha channel you can turn off saving the video channel by unchecking
the "Video" box.
Alpha (Compressed/Uncompressed) rate (MB/s)
Same as above, except these options control alpha channel saving.
[2] Inject Frames into Existing Clip
Sometimes, you may want to re-render only a part of your animation. The "Inject Frames into Existing Clip" saver mode serves this purpose. By selecting this option, you instruct the LockStep AU preview builder to "inject" the frames ("video or video and alpha, depending on format of existing file) into an existing DPS media file.
Inject Frame Offset
During injection of frames into existing clip file, this offset is added
to the frame number to obtain its position in the resulting file to be replaced.
Flags
Alpha Mixed Video
Your video output may be generated from color samples only (it is called
"Plain" mode) or you can combine the opacity information with color samples
and generate alpha-multiplied image onto video output ("Alpha Mixed").
Pad to Fixed Bytesize
When selected, this will force each frame to use exactly the same amount
of drive space based on the video compression rate. This is necessary when you
think that you may want to replace/edit a frame. For example, if you had a black
frame that you later wanted to replace with a complex frame, and padding was
not done, then the complex frame would not fit in the hole left open by the
black frame because of the compression differences (the complex frame would
require more space).
Invisible build
Once checked, the preview is not shown on the preview monitor during
its creation. Otherwise each frame is shown on the monitor after it is written
onto the Reality system drive.
Silent FPS
Do not complain when the FPS value in Aura does not match the Reality
HW default replay speed. Otherwise it warns the user with a requester.